We often hear the same reaction when a client sees the quote for their first custom-branded desiccant order. It usually goes something like this:
“Wait, the packet itself costs less than a penny. Why is the upfront investment for printing so high?”
It is a valid question. There is often a friction point where marketing dreams meet manufacturing reality. You want your brand on the packet to build trust, but the setup fees seem disproportionate to the product cost.
I want to pull back the curtain on how this industry works. This guide explains exactly where that money goes, from steel cylinders to machine calibration. More importantly, how you can optimize your design to minimize those costs while ensuring product safety.
Why "Small" Orders Cost Big on Custom Desiccant Printing
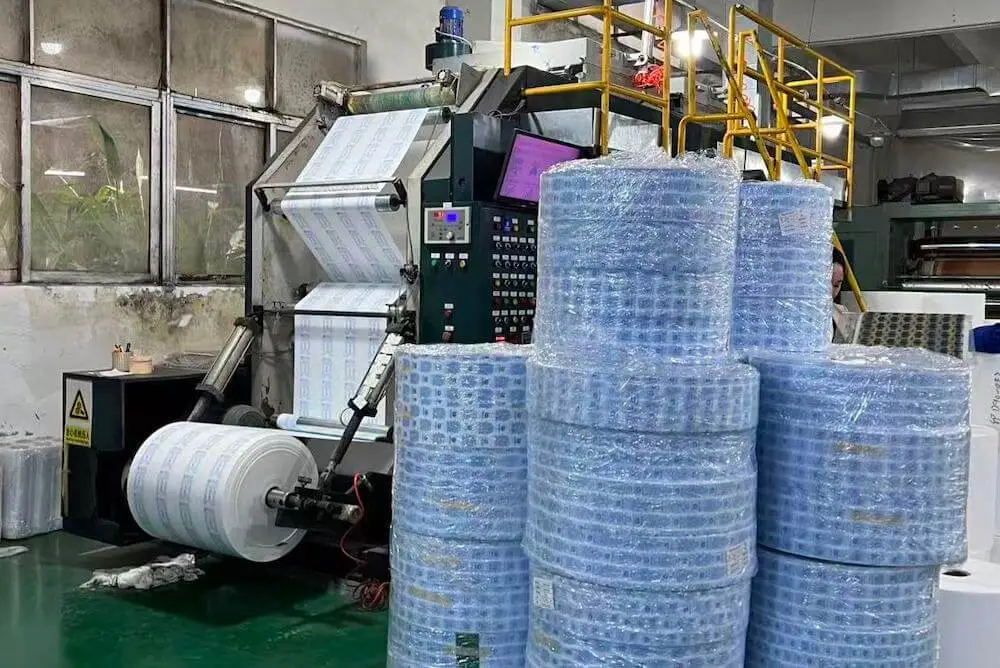
To understand the cost, you have to understand the machine. We don’t print desiccants one by one like a desktop printer. We print on Roll Stock, massive reels of film or Tyvek.
Roll Stock Logic
The printing presses we use are industrial beasts designed for scale. These high-speed presses run at 100 to 200 meters per minute. They are built to print millions of units, not thousands.
Waste is the part most people don’t see. When we set up a job, we have to calibrate the colors and align the plates. We might burn through 500 meters of film just getting the registration (alignment) perfect before a single sellable packet is produced.
For a “small” order of 50,000 packets, the actual printing time might only be 15 minutes. However, the machine setup and cleanup take hours. This heavy setup-to-run ratio is exactly what drives the Minimum Order Quantity.
Cylinder Fees vs. Plate Fees
When you see a line item for Mold Fee or Plate Fee, what are you actually paying for? In the desiccant industry, we primarily use Rotogravure (Gravure) printing.
Why You Pay for Cylinders
Unlike digital printing where you just hit “print,” Gravure requires us to physically engrave your design onto a steel cylinder. You need a separate steel cylinder for every single color in your design.
The upfront cost is higher. However, these chrome-plated steel cylinders are incredibly durable. They are good for millions of impressions. If you are looking at a long-term OEM strategy, this is the most cost-effective method over time.
Flexographic Options
If your design is simple, we sometimes use Flexography. Instead of steel cylinders, this uses flexible relief plates, think of a high-tech rubber stamp.
The setup is cheaper, but the print resolution isn’t as sharp as Gravure. For bold text, it works; for fine details, Gravure is superior.
Inks and Food Contact Compliance
This is the most critical section for anyone packaging food, pharmaceuticals, or garments. Not all printing is created equal.
Surface Print vs. Inner Print
This is the industry standard for safety, and we highly recommend it.
- Inner Print
We print the ink on the back of the outer layer of film, and then laminate another layer over it. The ink is effectively “sandwiched” between films. It never touches your product or the customer’s hands. This is mandatory for FDA compliance.
- Surface Print
The ink is printed directly on top of the material. It is cheaper, but the ink can abrade during shipping or potentially contaminate the product.
Regulatory Standards
If you are exporting to the US or EU, your ink matters. We ensure our inks adhere to FDA 21 CFR (for food contact), RoHS, and REACH standards. Cheap ink is a liability you cannot afford.
Tyvek vs. Transparent Films
Your design might look great on a computer screen, but the physical material changes the outcome.
Tyvek
Tyvek is breathable and strong, but it is challenging to print on. It has a fibrous, uneven surface, almost like a very fine fabric.
Because the surface isn’t perfectly smooth, inks can soak in slightly. Do not expect the high-gloss pop you see on plastic films. The look is more matte and industrial.
Transparent Film
If you choose clear film (OPP/CPP) to let customers see the beads inside, there is a catch. If we print your logo in Red directly on clear plastic, it will look translucent and hard to read.
We have to print a layer of White Ink underneath your logo to make it opaque and vibrant. In the world of printing, that white background counts as an “extra color,” meaning an extra cylinder fee.
Tips to Optimize Customization Costs
You want your brand, but you want to stay on budget. Here is how we help clients optimize:
1. Reduce Your Color Count
The math is simple: fewer colors = fewer cylinders.
Stick to 1-color printing. Use the same color for your Logo as you do for the generic text. If your logo is Blue, change the standard “Do Not Eat” warnings from Red to Blue. Now, we only need one cylinder for the whole job.
2. Utilize Public Domain Warnings
You don’t need to customize the entire packet.
Use our standard, pre-existing cylinder for the back of the packet, which contains the required safety warnings in multiple languages. You only pay for a custom cylinder for the front side with your logo. This cuts your setup fees in half.
Conclusion
Custom printing is a powerful way to elevate your brand perception, and it turns a commodity component into a professional brand touchpoint. However, it requires balancing your volume with the realities of machine setup fees.
Not sure if your volume justifies custom plates?
Don’t guess. Send us your logo/artwork file. We will provide a transparent cost analysis comparing a Stock Generic solution vs. a Custom OEM solution so you can make the decision that fits your budget.